Saturday, August 10, 2013

HTML5 Reset CSS

html5 reset cssThis is the simple way to handle your html page. like html tags body, list, table, etc. Just copy below
code into your new sheet. And save it as "reset.css". After saving file just LINK this CSS file into your Index page.


/* html5 Reset Stylesheet */
/* v1.1  */
/* Last Updated: 2013-08-10 */

html, body, div, span, object, iframe, h1, h2, h3, h4, h5, h6, p, blockquote, pre, abbr, address, cite, code, del, dfn, em, img, ins, kbd, q, samp, small, strong, sub, sup, var, b, i, dl, dt, dd, ol, ul, li, fieldset, form, label, legend, table, caption, tbody, tfoot, thead, tr, th, td, article, aside, canvas, details, figcaption, figure, footer, header, hgroup, menu, nav, section, summary, time, mark, audio, video {
 margin:0;
 padding:0;
 border:0;
 outline:0;
 font-size:100%;
 vertical-align:baseline;
 background:transparent;
}
*{
    margin:0;
    padding:0;
}
body {
    line-height: 1;
}
nav ul {
    list-style: none;
}
blockquote, q {
    quotes: none;
}
blockquote:before, blockquote:after, q:before, q:after {
    content: '';
    content: none;
}
a {
    margin: 0;
    padding: 0;
    font-size: 100%;
    vertical-align: baseline;
    background: transparent;
    outline:none;
    border:0;
}
a:hover{
    text-decoration:underline;
}
a:focus{
    outline:none;
    border:none;
}

img{border:none}
/* change colors as your requirement */
ins {
    background-color: #CCC;
    color: #000;
    text-decoration: none;
}
/* change colors as your requirement */
mark {
    background-color: #CCC;
    color: #000;
    font-style: italic;
    font-weight: bold;
}
del {
    text-decoration: line-through;
}
abbr[title], dfn[title] {
    border-bottom: 1px dotted;
    cursor: help;
}
table {
    border-collapse: collapse;
    border-spacing: 0;
}
input, select {
    vertical-align: middle;
}
/* change color as your requirement */
hr {
    display: block;
    height: 1px;
    border: 0;
    border-top: 1px solid #666666;
    margin: 1em 0;
    padding: 0;
}

Tuesday, August 6, 2013

Simple way to Css Hack for IE

Css Hack for IEDue to its relatively poor level of standards support, Internet Explorer tends to be the subject of most CSS hacks.

Internet Explorer was not designed to allow multiple versions to be installed at once, and Microsoft doesn't officially support any such configurations. If you use one of the hacked third party packages that attempts to do this, you will experience problems with version-specific conditional comments, among other things. This is because the different stand-alone copies still rely on a common centralized registry for certain data, including version information.

Although there is no simple way to cut through all of the issues with stand-alone versions of Internet Explorer, it is possible to force them to look elsewhere for their version information, thus fixing this issue with conditional comments.

Here is an example:

#element {
    color:orange;
}
#element {
    *color: white;/* IE6 + 7, doesn't work in IE8/9 as IE7 */
}
#element {
    _color: red;/* IE6 */
}
#element {
    color: green\0/IE8+9; /* IE8 + 9 + IE10pp4  */
}
:root #element { color:pink \0/IE9; }  /* IE9 + IE10pp4 */


CSS hacks are usually bad. You should probably do this instead.

<!--[if lt IE 7]><html class="ie6"> <![endif]-->
<!--[if IE 7]><html class="ie7"> <![endif]-->
<!--[if IE 8]><html class="ie8"> <![endif]-->
<!--[if gt IE 8]><!--> <html><!--<![endif]--> 


This uses conditional comments to target certain versions of Internet Explorer, and the element receives a custom class name for different versions of IE, and no class name when the browser is not IE.

Then in your CSS, you would target IE7 or IE8 like this:


.element { 
    margin-bottom: 20px; 

 
.ie7 .element { 
    margin-bottom: 10px; 

 
.ie8 .element { 
    margin-bottom: 15px; 
}

Wednesday, July 31, 2013

Responsive Design

Responsive DesignResponsive web design is no doubt a big thing now. If you still not familiar with responsive design,
check out the list of responsive sites that I recently posted. To newbies, responsive design might sound a bit complicated, but it is actually simpler than you think. To help you quickly get started with responsive design, I've put together a quick tutorial. I promise you can learn about the basic logic of responsive design and media queries in 3 steps (assuming you have the basic CSS knowledge).

Meta Tag (view demo)

Most mobile browsers scale HTML pages to a wide viewport width so it fits on the screen. You can use the viewport meta tag to reset this. The viewport tag below tells the browser to use the device width as the viewport width and disable the initial scale. Include this meta tag in the <head>

<meta name="viewport" content="width=device-width, initial-scale=1.0">

Internet Explorer 8 or older doesn't support media query. You can use media-queries.js or respond.js to add media query support in IE.

<!--[if lt IE 9]>
    <script src="http://css3-mediaqueries-js.googlecode.com/svn/trunk/css3-mediaqueries.js"></script>
<![endif]-->


HTML Structure

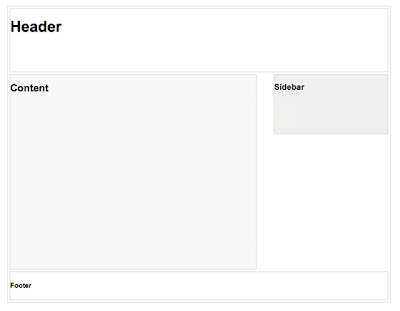
In this example, I have a basic page layout with a header, content container, sidebar, and a footer. The header has a fixed height 180px, content container is 600px wide and sidebar is 300px wide. 

Responsive Design layout

Media Queries

CSS3 media query is the trick for responsive design. It is like writing if conditions to tell the browser how to render the page for specified viewport width.

The following set of rules will be in effect if the viewport width is 980px or less. Basically, I set all the container width from pixel value to percentage value so the containers will become fluid.

Responsive Design

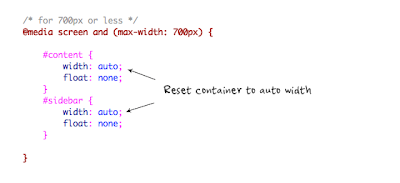
Then for viewport 700px or less, specify the #content and #sidebar to auto width and remove the float so they will display as full width.


For 480px or less (mobile screen), reset the #header height to auto, change the h1 font size to 24px and hide the #sidebar.

Responsive Design  

You can write as many media query as you like. I've only shown 3 media queries in my demo. The purpose of the media queries is to apply different CSS rules to achieve different layouts for specified viewport width. The media queries can be in the same stylesheet or in a separate file.

Reference : Web Designer Wall


Friday, January 4, 2013

How to use the CSS Sticky Footer on your website


HTML and CSS
 Add the following lines of CSS to your stylesheet. The negative value for the margin in .wrapper is.footer and .push. The negative margin should always equal to the full height of the footer (including any padding or borders you may add).
the same number as the height of

* {
margin: 0;
}
html, body {
height: 100%;
}
.wrapper {
min-height: 100%;
height: auto !important;
height: 100%;
margin: 0 auto -4em;
}
.footer, .push {
height: 4em;
}


Follow this HTML structure. No content can be outside of the .wrapper and .footer div tags unless it is absolutely positioned with CSS. There should also be no content inside the .push div as it is a hidden element that "pushes" down the footer so it doesn't overlap anything.

<html>

    <head>

        <link rel="stylesheet" href="layout.css" ... />

    </head>

    <body>

        <div class="wrapper">

            <p>Your website content here.</p>

            <div class="push"></div>

        </div>

        <div class="footer">

            <p>Copyright (c) 2013</p>

        </div>

    </body>

</html>


Multi column layout with Sticky Footer


Add clear to the .push div

.footer, .push {
clear: both;
}
 Reference : Resources for Web Designer